The Admin API Keys view displays a list of API Keys that are allocated to teams and users. Using the tools in this view, you can assign users with keys which support and control the activities they can perform via the Eyes API, such as:
- Running tests
- Viewing test results
- Extracting data from the test results
- Editing and saving tests
- Accepting or rejecting checkpoint diffs
- Updating baselines
- Merging branch baselines
This section deals with the API Keys view and the operations that you can perform on the view.
- API Keys view layout.
- API Key permission types.
- Adding new API Keys.
- Editing an API Key.
- Copying an API Key.
- Deleting API Keys
API Keys view layout
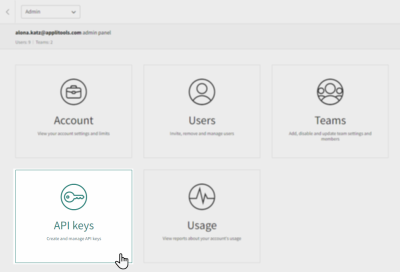
To access the API Keys view, on the Admin panel, click on the Teams tile.
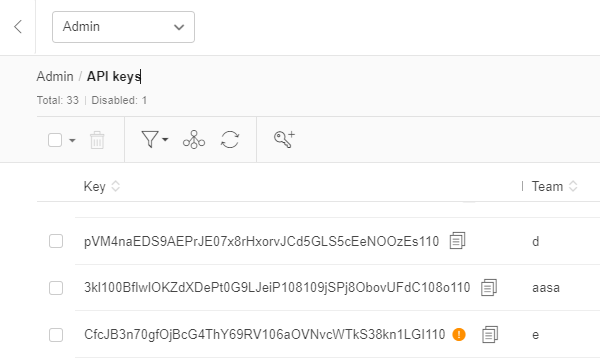
This opens a view which shows all the API keys defined for the account along with their properties. The toolbar buttons enable you to filter and group the list of API keys, and to manage the list of APIs by adding new keys and deleting selected keys. Clicking any row opens a dialog that allows you to change the API Key properties.
The API Keys view displays a table in which each row lists an API Key associated with a team or team member.
API Key details displayed by default in the table are:
- Key: Lists the actual API Key and is a display-only field. The API Key is issued to users by name. It should be treated as confidential and not shared with other users.
- Team: The name of the Team with which the API Key is associated.
- User: The name of the User with which the API Key is associated.
- Permissions: The permission types that can be assigned to the API Key (see API Key permission types)
- Purpose: Allows you to input a description of what the API is used for. The property supports input as free text. This an optional property.
- Expires At: Date that the API key expires. If this field is blank, the key does not expire.
- Last Access: The most recent time the API Key was used.
Additional properties can be displayed, and visible properties can be hidden by opening the column editor by clicking on the button in the tool bar. The properties which by default are hidden are:
- Team ID: Internal ID that is assigned to the team when the team is created. Customer Services may request the ID when handling a customer request that relates to the team.
- Created At: The date and time when the API Key was created.
- Created By: The name of the Administrator that created the API Key.
- Disabled: Indicates that the API key has been disabled.
- Expired: Indicates that the API key has expired (see Setting the API Key expiry date).
API Key permission types
There are several API Key permission types that you can assign when creating or editing an API Key.
- Read: Allows users to access tests and test results, but does not allow them to execute tests, change data through the API, or make any changes to the tests.
- Execute: Allows users to execute tests but does not allow them to access the tests and test results, change data through the API, or make any changes to the tests.
- Write: Allows users to access the test results, make and save changes to test results, save such changes to the baselines, and merge branch baselines.
- Merge: Allows users to use the API to merge branch baselines but does not support read, execute, or any write operations other than merging branches.
Test Manager user permissions and API Key permissions
When you assign an API Key to a user, the API Key permissions can only include a subset of the permissions that are set for their given team. If the user's team has View only user permissions, the user cannot be granted an API Key with more extensive permissions (e.g. write permissions).
Adding new API Keys
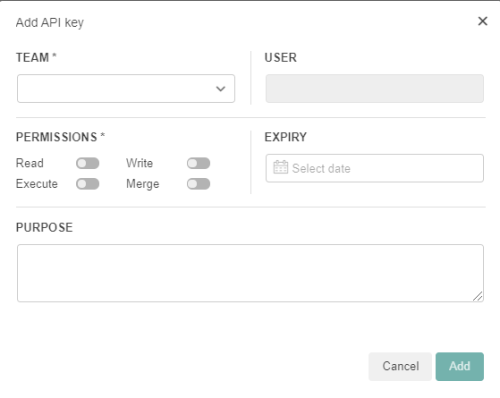
You can add a new API Key in the Add API Key dialog box.
To add a new API Key:
- Click Add a new API Key in the API Keys toolbar to open the Add API Key dialog box.
- Select a team from the Team drop-down menu.
- Enter the user's email address in the User edit box. Click in the edit field and type an email address or select a team member from the drop-down list. Skip this step if you want to create an API Key for a Team only.
- Select one or more options from the Permissions group to set the user profile.
- Optionally, you can enter a free text comment stating the purpose of the API key in the Purpose edit field.
- Optionally, you can set an expiry date for the API Key from the Expiry drop-down calendar.
- Click Add.
The new API Key is added to the API Keys list.
Editing an API Key
You make these modifications in the Edit API Key dialog box.
To edit an API Key:
- Open the API Keys view.
- Filter for or identify the row in the API Keys table that contains the API Key you want to edit.
- Click anywhere in the row to open the Edit API Key dialog box.
- Make any required changes to the API Key parameters.
- Click Apply to save the changes and close the Edit API Key dialog box.
Disabling an API Key
Disabling an API Key prevents the team or user from using the API to perform test activities that are supported by the key. Disabling the use of an API Key in this way allows you to enable its use at a later time as opposed to deleting the API Key, which erases the key from the system.
To disable an API Key:
- Access the Edit API Key dialog box as described above.
- Clear the Enable option to disable use of the API Key.
- Click Apply to save the changes and close the Edit API Key dialog box.
Changing the API Key permissions
You may need to change API Key permissions for a user. Note that the Test Manager user permissions affect the API Key permission options that are available. This is an operation performed on the Teams view. See Setting user permissions for more information.
To change the API Key permissions:
- Access the Edit API Key dialog box as described above.
- Change the Permissions options as required for the API Key.
- Click Apply to save the changes and close the Edit API Key dialog box.
Setting the API Key expiry date
You can set an expiry date for an API Key. If you reach the expiry date, the API Key is disabled and users are prevented from using that API Key. In the API Keys table, an orange-colored warning symbol next to an API Key indicates that it has expired.

- Access the Edit API Key dialog box as described above.
- Click on the Expiry drop-down calendar field and change the Expiry date for the API Key.
- Click Apply to save the changes and close the Edit API Key dialog box.
Copying an API Key
To allow tests to interact with Eyes you must set the relevant API Key in your application code using the class$configuration$setapikey$method . Alternatively you can set the environment variable APPLITOOLS_API_KEY to the value of the API Key. For that purpose, you can copy an API Key to the clipboard from the API Keys view or from the Edit API Key dialog box.
To copy an API Key:
- Open the API Keys view.
- Filter for or identify the row in the API Keys table that contains the API Key you want to copy.
- Hover over the row and click Copy key to clipboard .
Note: When the Edit API Key dialog box is open, the Copy key to clipboard link is adjacent to the Key field.
See also How to retrieve your API keythis latter method is convenient for use by users who are do not have admin rights and can not access the admin pages.
Deleting API Keys
You can delete one or more API keys by selecting the checkbox to the left of the API key and then clicking on the button on the tool bar. You can also delete an API key by clicking on the Delete button in the Edit API Key dialog.


