I’ve been playing around with Applitools for quite some time now, and I’d like to share what I’ve found to help you quickly troubleshoot React bugs and fix them fast.
My most recent articles in this series showed you how to integrate Applitools with Angular and Storybook. In case you missed these, you can find them here:
If you’re not already familiar, Applitools is an automated visual regression testing framework. It focuses on the visual aspects of your app — as opposed to functional testing — and plays a major role in exposing the visual differences between baseline snapshots and both current and future snapshots.
Applitools integrates with dozens of testing frameworks, such as Cypress.io, Storybook, and Selenium. It provides SDKs for use in your projects to seamlessly communicate and interact with Applitools, to send both baseline and test screenshots.
This article delves into a great new feature offered by Applitools: Automated Root Cause Analysis (RCA). The demo section will use a ReactJS app, together with Cypress.io, to demonstrate the RCA feature and its application.
Disclaimer: The main goal of this article is simply to introduce you to the Applitools RCA feature. If you are looking for an in-depth tutorial on the topics mentioned in this article, I recommend the following links:
Automated Root Cause Analysis
The concept of Root Cause Analysis stems from the world of management, where it’s defined as a method of problem-solving used for identifying the root causes of faults or problems.
So far, Applitools has been focusing on visual testing by comparing the baseline and the current test run snapshot through their AI engine. It finds the visual differences in order to map them graphically. There was previously no way to search your codebase for a reason behind any visual testing bug. As you may know, searching through code is nightmarish, time-consuming, and tedious!
This is where Applitools steps in with RCA, showing you the exact DOM and CSS changes between the baseline snapshot and the current test run snapshot.
Why is this so important for both developers and QA testers? Let’s take a look.
Demo
I’ll demonstrate the RCA feature using the Calculator project, previously published as part of the example projects on the React JS website.
Next, we’ll follow these steps to run the Calculator and add a few Cypress test cases.
Step 1: Clone the repository locally by issuing the following git command:
git clone git@github.com:ahfarmer/calculator.git
Step 2: Install all the npm dependencies by issuing the following command:
npm install
Step 3: Run the app:
npm run start
And you should see something like this:
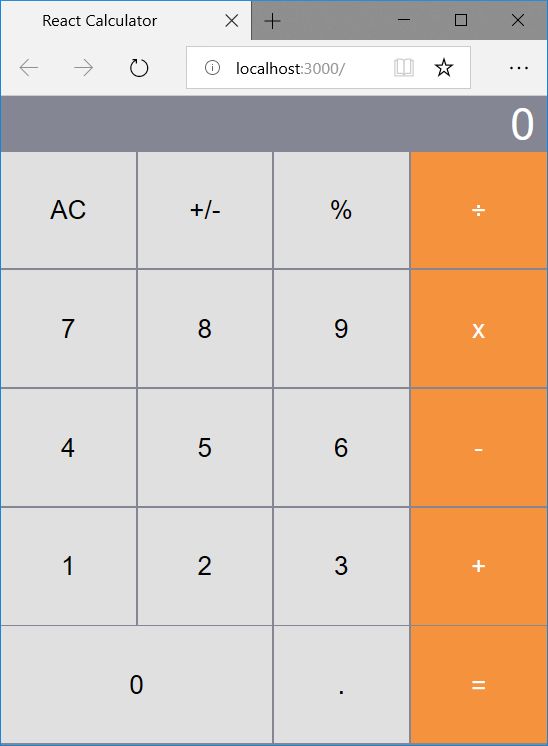
Voila. It works!
Step 4: Add Cypress package to the project:
npm install --save-dev cypress
The Cypress npm package adds a set of test files to help you with writing your own automated tests.
Step 5: Run the Cypress tests available now in the project by issuing the npx Cypress CLI command:
npx cypress run

Now that Cypress is running properly, let’s add the Applitools Eyes SDK for Cypress package.
Step 6: Add the Applitools Eyes Cypress SDK package to the project:
npm install @applitools/eyes.cypress --save-dev
The Applitools Eyes Cypress SDK is a simple Cypress plugin. Once installed, it adds a few commands to the main cy object.
More specifically, it adds three main methods: cy.eyesOpen to start the test, cy.eyesCheckWindow to take screenshots (for each test step), and cy.eyesClose to close the test.
Let’s write our first Cypress test case to simulate adding two numbers and validating the result of the addition operation.
Step 7: Inside the cypress\integration folder, create the addition.spec.js file and paste the following:
The spec file is self-explanatory. However, there’s one thing to note here. In terms of the selectors used inside cy.get() methods, the Calculator app never uses any ID or Class to distinguish buttons.
I used a nice feature offered by Google Chrome DevTools to copy the selector of the buttons I am interested in.
To do so yourself, simply follow these steps:
- Right-click on the button.
- Select “Inspect.” Chrome’s DevTools opens on the Elements tab with the element highlighted in blue.
- Right-click the highlighted element.
- Select “Copy” > “Copy selector.”
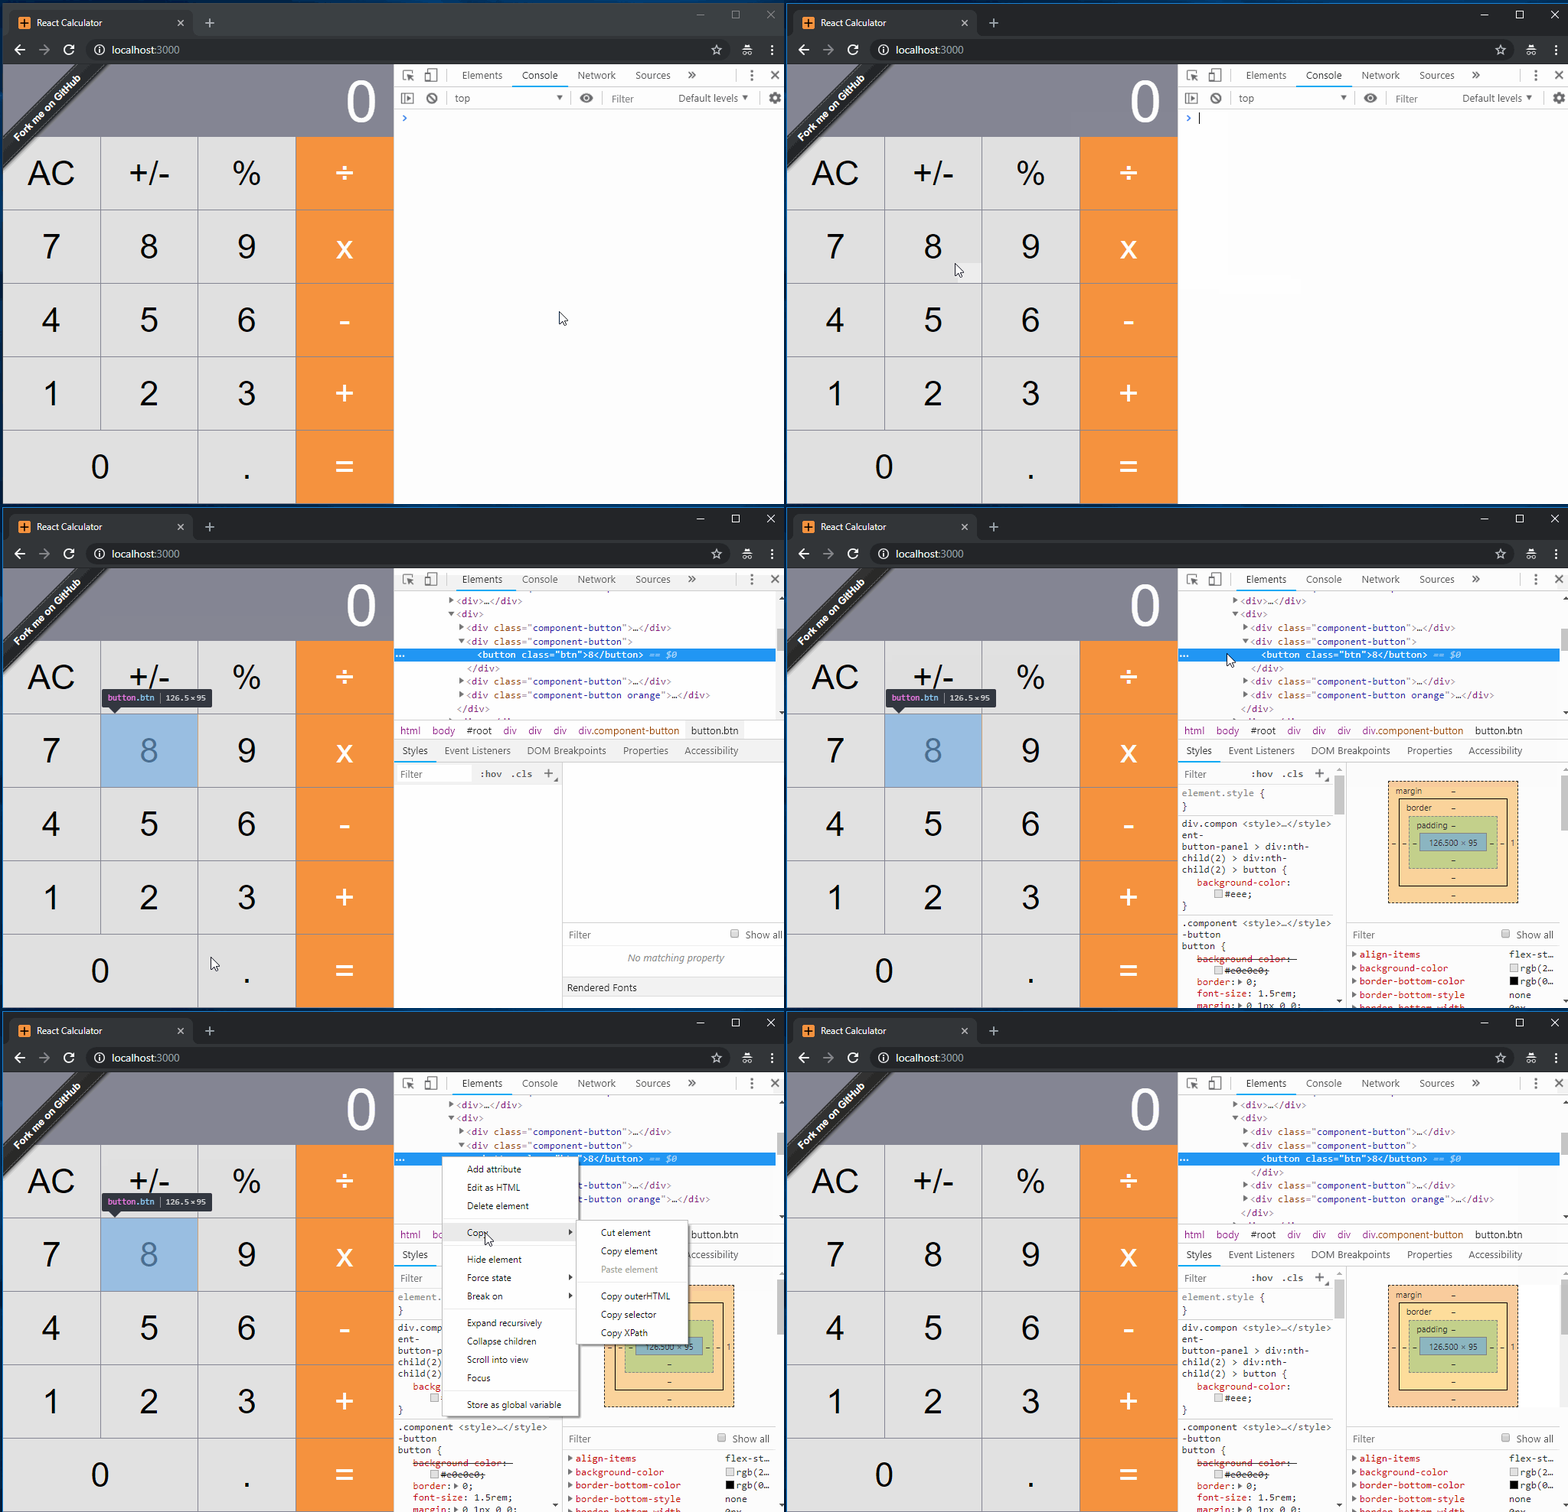
Next, let’s run the spec file to make sure our test runs successfully.
Step 8: Run the spec file:
npx cypress run --spec="cypress\integration\operations\addition.spec.js"
Now that our spec file runs successfully, let’s make use of the Applitools Eyes Cypress SDK commands to capture a few snapshots.
Step 9: Add the Applitools Eyes Cypress SDK commands to the addition.spec.js file:
The code is self-documented.
Now, to integrate Applitools Eyes Cypress SDK into a spec file, you follow the Workflow below:
Start a new test
cy.eyesOpen({
    appName: '...',
    testName: '...',
    browser: { ... },
});
Take a snapshot (You may repeat this step wherever you want to take a snapshot)
cy.eyesCheckWindow('...');
End the test
cy.eyesClose();
Step 10: Run the spec file:
npx cypress run --spec="cypress\integration\operations\addition.spec.js"
Step 11: Check the test run in Applitools Test Manager.
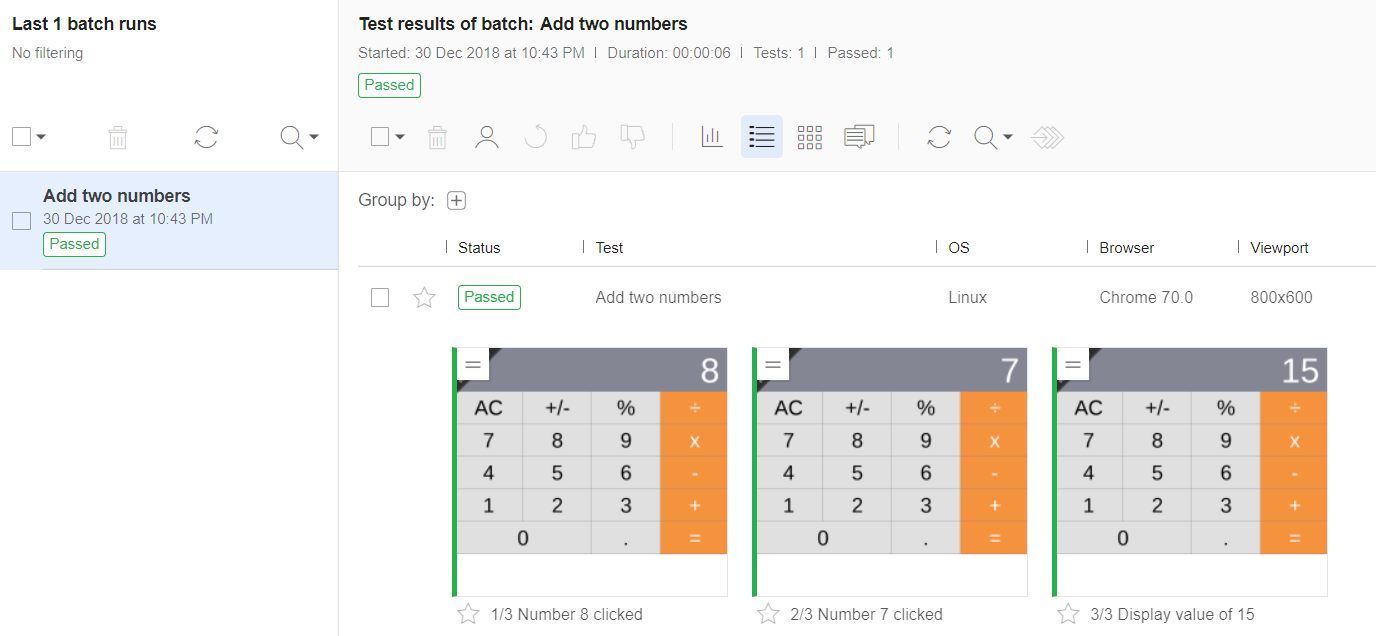
Notice the Add two numbers test run on the grid. Clicking this test run opens the three snapshots that were taken when we ran the Cypress spec file.
The first snapshot is labeled “Number 8 clicked.”The image shows the number 8 in the display of the calculator.
The second snapshot is labeled “Number 7 clicked.” This one shows the number 7 in the display.
Finally, the third snapshot is labeled “Display value of 15.” The image shows the number 15 in the display of the calculator.
Since this is the first test run, Applitools will save these as the baseline images.
Next, we will simulate a visual difference by changing a CSS selector and letting Applitools detect this change. Then, we’ll run the test again and see the results.
Step 12: Let’s assume that the CSS selectors were changed and caused a change in the background of the Number 8 button. Add the following CSS selector to Button.css file as follows:
div.component-button-panel > div:nth-child(2) > div:nth-child(2) > button {
  background-color: #eee;
}
Ready? Let’s run the spec file once again.
Step 13: Run the spec file. The test case fails, as expected, and Applitools detects a background color change for the Number 8 button.
npx cypress run --spec="cypress\integration\operations\addition.spec.js"
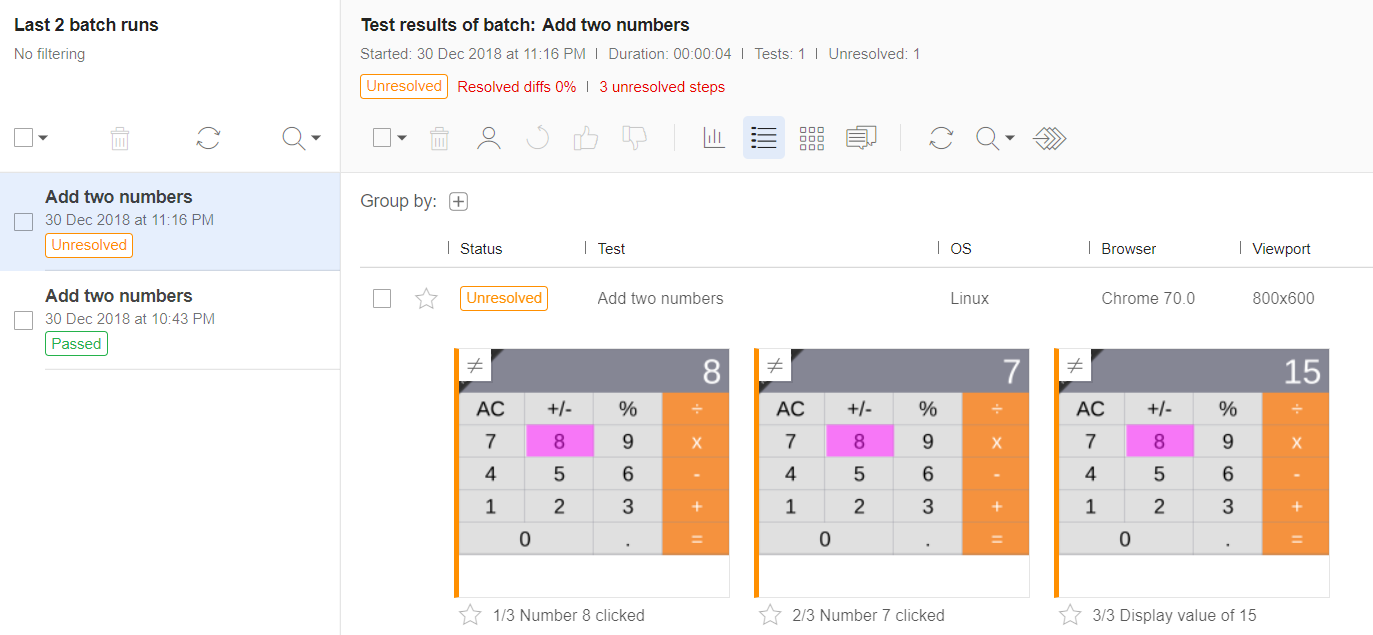
Notice how the Applitools Test Manager recorded the second run of the test case and highlighted the visual difference in the three snapshots.
Step 14: Click on the first snapshot and compare to the baseline.
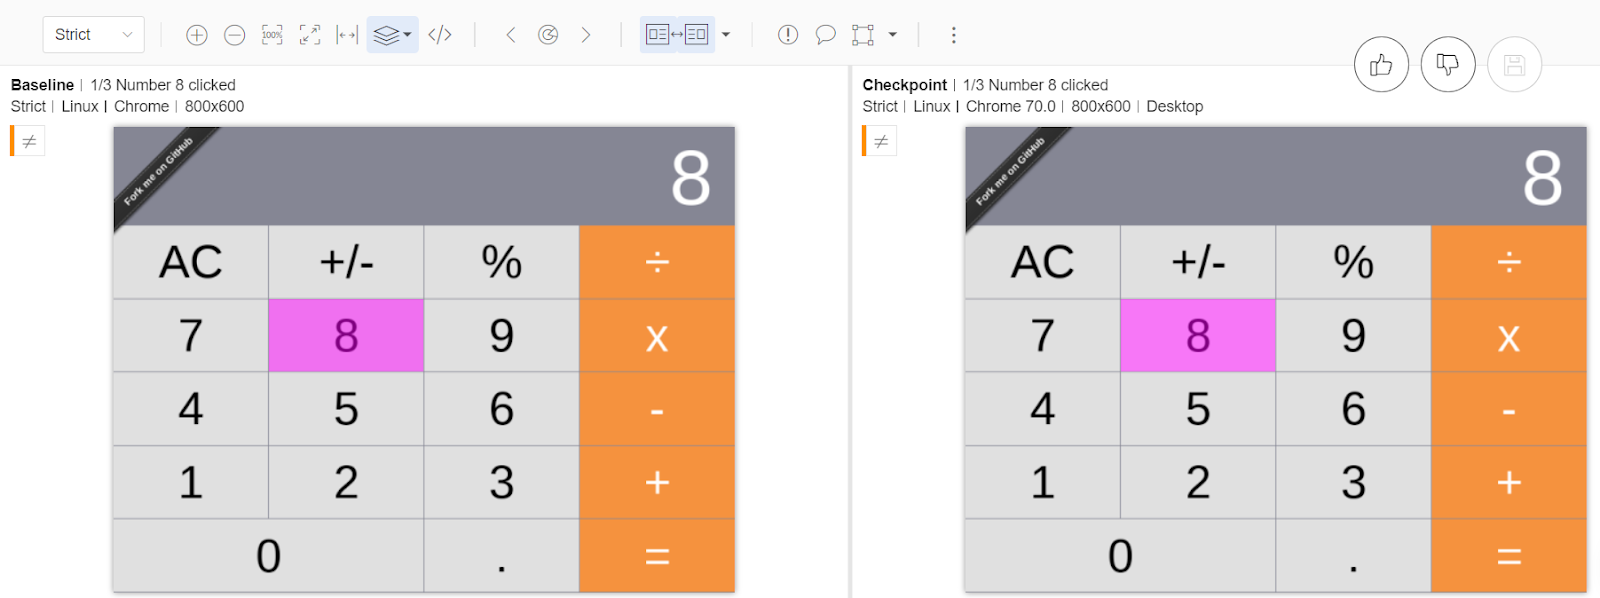
Applitools Test Manager displays both the baseline snapshot and the current test case run. Also, the number 8 button is highlighted to signala visual difference.
Step 15: Click on the RCA tool icon (highlighted in the red rectangle) to get a full analysis of the source of this visual bug.

Next, you will be asked to select the visual difference you want the RCA to assess.
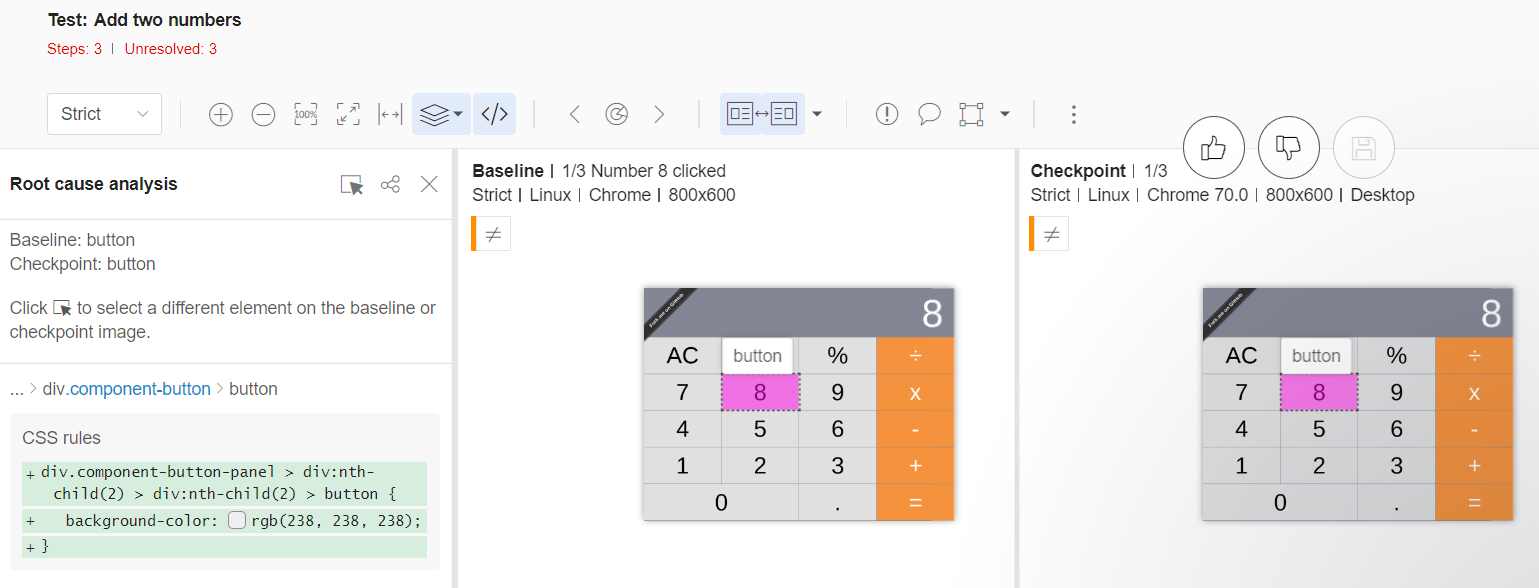
The RCA tool runs and shows the root cause of this visual difference, which is a change in the CSS Rules.
The RCA tool can also detect DOM changes. Simply use the RCA Pointer Tool to select two buttons: 7 on the baseline (left side) and 5 on the current test run snapshot (right side). The results are in the image below.
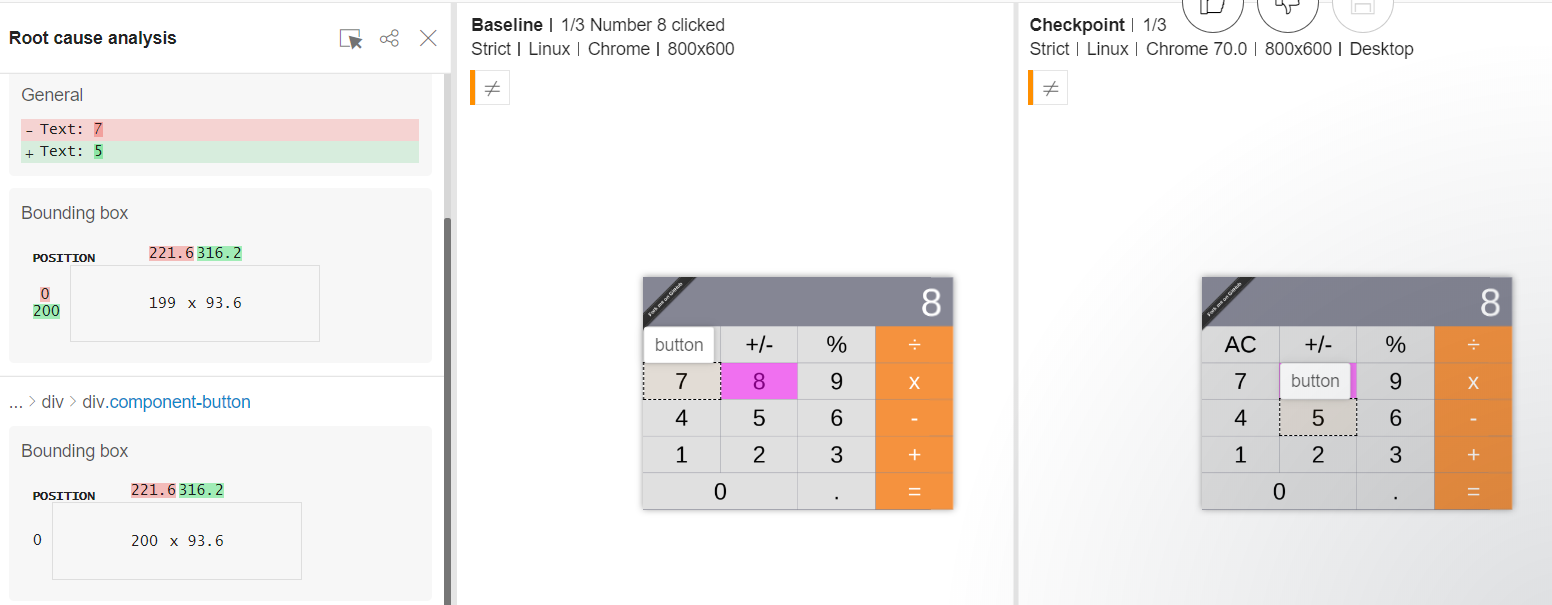
In the Text content, the RCA shows the difference between the two buttons. It also gives details about the bounding box for each button and the position.
Let’s change other DOM attributes and run the test again.
Step 16: Next, locate the src/component/Button.js file and add a class=”btn” to the HTML button:
<div className={className.join(" ").trim()}>
   <button class="btn" onClick={this.handleClick}>{this.props.name}
   </button>
</div>
Now, let’s run the test and check the results.
Step 17: Run the spec file. The test case fails, and Applitools detects a change in attributes for the buttons used to form the Calculator.
npx cypress run --spec="cypress\integration\operations\addition.spec.js"

Another category RCA detects is the Attributes category. It shows that in the current test run, each button has a new class attribute set.
Applitools RCA is both powerful and convenient: It can pinpoint out the exact DOM/CSS change. Then, all you have to do is locate the codebase and do whatever is required to pass your tests.
Remember that you can always accept the current test run and update the baseline, or reject the test run and keep the existing baseline snapshot.
RCA supports a set of DOM/CSS categories of change, including:
- Textual changes
- CSS Property changes
- Attributes changes
- Bounding Box changes
- Tag changes (When an entire Tag gets changed from one test run to another. For instance, when a button is replaced by a hyperlink.)
Conclusion
The advent of Applitools RCA is a game-changer! Not only can you use Applitools for validating visual differences in your web app, but you can also make use of RCA to go in-depth and find the exact source of a visual difference bug with ease and minimal effort.
Happy Testing!
How much time will you save with Root Cause Analysis? Let us know in the comments.


